The Honeywell VisionPRO 8000 thermostat offers advanced temperature control with a user-friendly interface. This guide provides step-by-step instructions for installation, setup, and configuration to ensure optimal performance and energy efficiency.
Overview of the Honeywell VisionPRO 8000 Thermostat
The Honeywell VisionPRO 8000 is a programmable thermostat designed for precise temperature control and energy efficiency. With its large touchscreen display, it simplifies climate control, offering features like programmable scheduling and smart home integration. This thermostat supports Wi-Fi connectivity, enabling remote management through Honeywell’s app. It also includes advanced sensors for accurate temperature readings and compatibility with various heating and cooling systems, including heat pumps. The VisionPRO 8000 is known for its user-friendly interface and robust functionality, making it a popular choice for modern homes seeking comfort and energy savings.
Key Features and Benefits of the Honeywell 8000 Thermostat
The Honeywell 8000 thermostat features a large touchscreen display for intuitive navigation and control. It offers programmable scheduling, allowing users to set custom temperature profiles for energy efficiency. With Wi-Fi integration, the thermostat connects seamlessly to Honeywell’s app, enabling remote adjustments. Advanced sensors ensure precise temperature readings, while compatibility with multiple HVAC systems, including heat pumps, provides versatility. The thermostat also includes a lockout feature to prevent unauthorized changes, enhancing security. Its energy-saving capabilities and user-friendly design make it an ideal solution for homeowners seeking both comfort and cost efficiency in their climate control systems.

Preparation for Installation
Begin by removing the old thermostat and turning off the HVAC system. Prepare the wallplate and gather necessary tools. Follow manufacturer instructions for a smooth process.
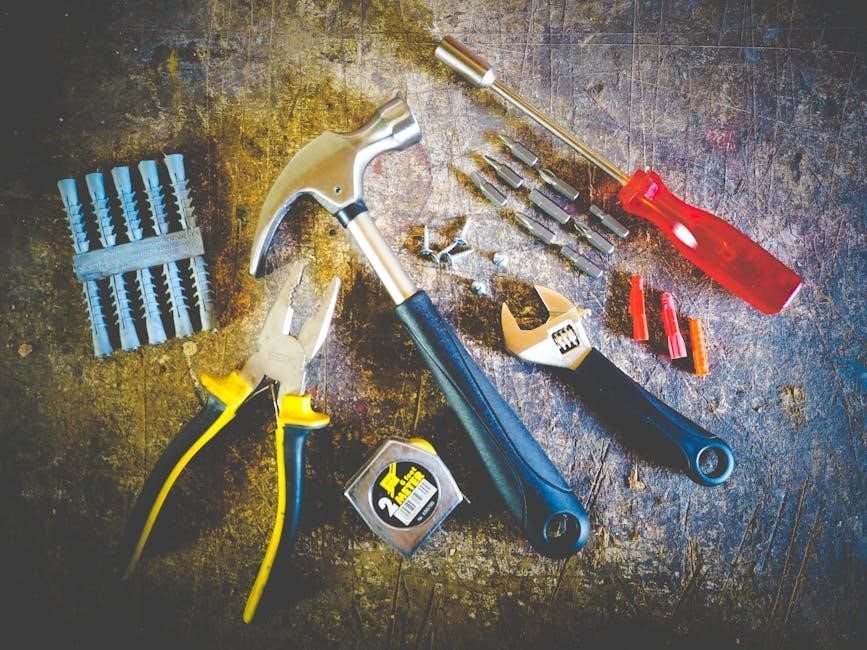
Tools and Materials Needed for Installation
- A screwdriver (both Phillips and flathead) for removing screws and connecting wires.
- Pliers for gripping and bending wires if necessary.
- A wire stripper to prepare wire ends for connections.
- A voltage tester to ensure power is off before starting work.
- The Honeywell VisionPRO 8000 thermostat unit and its wallplate.
- Mounting screws provided with the thermostat or compatible with your wall type.
- Optional: Wall anchors for securing the wallplate in drywall or other materials.
Ensure all tools are within reach to streamline the installation process and avoid delays. Always verify that the power to your HVAC system is off before proceeding.
Understanding the Wiring Diagram and System Requirements
Before installing the Honeywell 8000 thermostat, it’s essential to understand the wiring diagram and system requirements. The thermostat typically requires a 24V power supply and connects to your HVAC system through terminals labeled R, W, Y, G, C, and possibly auxiliary wires for features like dehumidifiers. The R terminal provides power, while W controls heating, Y for cooling, G for the fan, and C for the common wire, which is crucial for continuous power. Ensure compatibility with your HVAC system, including single-stage, multi-stage, or heat pump configurations. Always match the wiring diagram in the user manual to your home’s setup to avoid errors. If unsure, consult a professional to ensure safe and proper installation. Proper wiring ensures optimal performance and safety.
Installation Process
The Honeywell 8000 installation involves removing the old thermostat, mounting the wallplate, and connecting wires. Follow the wiring diagram for accurate connections and secure the thermostat in place.
Step-by-Step Guide to Removing the Old Thermostat
Start by turning off the power to your HVAC system at the circuit breaker or fuse box to ensure safe removal.
Gently pull the old thermostat away from the wall. For models with a button on the wallplate, press and hold it while pulling.
If no button is present, grasp the thermostat firmly and pull evenly from the sides and bottom to detach it from the wallplate.
Once removed, carefully disconnect the wires from the old thermostat, noting their colors and positions for later reference.
Set the old thermostat aside, taking care not to damage the wires or the wallplate.
Ensure the area is clean and ready for the new thermostat installation. This step is crucial for a smooth transition to the Honeywell 8000.
Installing the Wallplate and Mounting the Thermostat
Align the pins on the back of the Honeywell 8000 thermostat with the slots on the wallplate.
Gently push the thermostat onto the wallplate until it snaps securely into place.
Ensure the thermostat is properly seated and the wallplate is level.
Remove any protective tabs or covers from the thermostat to activate the touchscreen.
Verify that the thermostat is firmly mounted and ready for wire connections.
Double-check the alignment to prevent any installation issues. This step ensures a stable base for the thermostat’s operation.
Connecting the Wires and Ensuring Proper Configuration
Turn off the power to your HVAC system at the circuit breaker.
Remove the old thermostat and label the wires for identification.
Connect the wires to the corresponding terminals on the Honeywell 8000 wallplate.
Ensure the R (24V power) and C (common) wires are securely connected.
Attach the remaining wires (W, Y, G, etc.) according to your system’s requirements.
Refer to the wiring diagram for specific configurations.
Turn the power back on and test the system to confirm proper operation.
Verify that all wires are tightly connected to prevent loose connections.
Use the thermostat’s menu to configure settings like heating/cooling type and fan operation.
Save your settings to complete the configuration process.

Post-Installation Setup
After installation, set the date, time, and basic configurations. Navigate to the menu, select system settings, and configure options like temperature units and display brightness. Proceed to advanced features next.
Setting the Date, Time, and Basic Configuration
To set the date and time on your Honeywell 8000 thermostat, navigate to the menu and select “System Settings.” Choose “Date and Time” and input the current date in MM/DD/YYYY format and time in 24-hour HH:MM format. Ensure accuracy, as the date code may serve as a password for installer options. Next, configure basic settings like temperature units (Fahrenheit or Celsius) and display brightness. Adjust these to your preference, considering factors like screen visibility at night. Finally, review and save your settings to ensure proper thermostat operation. This step is crucial for scheduling and energy-saving features later on.
Unlocking Installer Options and Password Setup
To access the Installer Options on your Honeywell 8000 thermostat, press “Menu” and scroll to “Dealer Information.” Locate the Date Code at the bottom, which serves as the default password. Return to the “Installer Options” menu, enter this code, and gain access to advanced settings. For security, you can change this password to prevent unauthorized changes. This step ensures that only qualified personnel can modify critical system configurations. Proper password setup is essential for maintaining system integrity and preventing accidental adjustments that could affect performance. Always keep the password secure to avoid unintended modifications.

Advanced Features and Configuration
The Honeywell 8000 thermostat supports Wi-Fi connectivity, enabling smart home integration and remote control via the Honeywell Home app. Program custom schedules and energy-saving modes for optimal efficiency.
Setting Up Wi-Fi and Smart Home Integration
To connect your Honeywell 8000 thermostat to Wi-Fi, first ensure your home network is active. On the thermostat, navigate to the menu, select Wi-Fi setup, and choose your network. Enter your password using the touchscreen. Once connected, download and install the Honeywell Home app to control your thermostat remotely. For smart home integration, link your thermostat to platforms like SmartThings or Alexa for voice control. Ensure your system is compatible with the thermostat’s capabilities. This integration allows seamless operation and energy monitoring, enhancing your home’s comfort and efficiency.
- Connect to Wi-Fi via the thermostat’s menu.
- Download the Honeywell Home app for remote control.
- Link with smart home systems for advanced functionality.
Programming Schedule and Energy-Saving Settings
The Honeywell 8000 thermostat allows you to create a customized schedule for optimal comfort and energy savings. Using the touchscreen, program temperature settings for wake, leave, return, and sleep periods. Energy-saving features include automatic temperature adjustments and smart recovery, which learns your system’s performance to pre-heat or cool. You can also set temperature limits to prevent extreme settings. For added convenience, use the Honeywell Home app to adjust schedules remotely and monitor energy usage. These features ensure your home stays comfortable while reducing energy consumption.
- Program schedules for up to seven days.
- Set energy-saving modes to optimize efficiency.
- Use smart recovery for efficient heating and cooling.
- Adjust settings remotely via the Honeywell Home app.
Troubleshooting Common Issues
Common issues include connection failures and sensor errors. Check wiring connections and ensure proper network setup. Resetting the thermostat or updating its software often resolves these problems.
Resolving Connection Failures and Sensor Errors
Connection failures often occur due to incorrect wiring or network issues. Ensure all wires are securely connected to the correct terminals. Restart the thermostat and router to reset the Wi-Fi connection. For sensor errors, check if the temperature sensor is properly calibrated and free from obstructions. If issues persist, consult the user manual or contact a professional. Regularly updating the thermostat’s software can also resolve many connectivity and sensor-related problems. Always verify the system’s compatibility with your home’s HVAC setup to avoid recurring issues.
Addressing Common Installation and Setup Mistakes
One common mistake during installation is incorrect wiring, which can lead to system malfunctions. Always refer to the wiring diagram specific to your HVAC system. Ensure the wallplate is properly mounted and aligned with the thermostat. If the thermostat doesn’t snap into place, check for obstructions or misalignment. During setup, entering the wrong date code password can lock you out of installer options. Use the date code found in the Dealer Information menu. Forgetting to enable Wi-Fi or entering incorrect network credentials can prevent smart home integration. Restart the thermostat after setup to ensure all configurations are applied correctly. Regularly check for software updates to maintain optimal performance.